Previously
During the last episode, we’ve discussed a learning scheme that can help you to avoid having most acquired information from floating away.
In what follows, we’ll use an example to walk through the scheme step by step.
Enough theory, time for practice
Step 0: Choose what to learn
For this article, I’ve decided to use the example of ScalaTest matchers. That topic makes a good example, because:
-
the subjects squarely in the category of "in one ear, out the other" ,
-
remembering brings a tangible benefit - reports for the specialised matchers are more meaningful than those from a simple
should be equal.
Let’s start, shall we?
Step 1: Highlight Key Passages (Optional)
The matcher documentation (again, available here) is actually a good case where this step can be skipped. The docs are compact, information-rich, and the most notable facts are plainly visible.
Step 2: Create Mind-map-like notes
Before we start, if you don’t have a favorite mind-mapping application, download and install Freemind.
First of all, we’re not actually going to do the full docs, just enough to create a relatively good example. So, let’s do the first 3 sections, up to and including "checking strings".
Here’s how a note-centered mind map might look like:
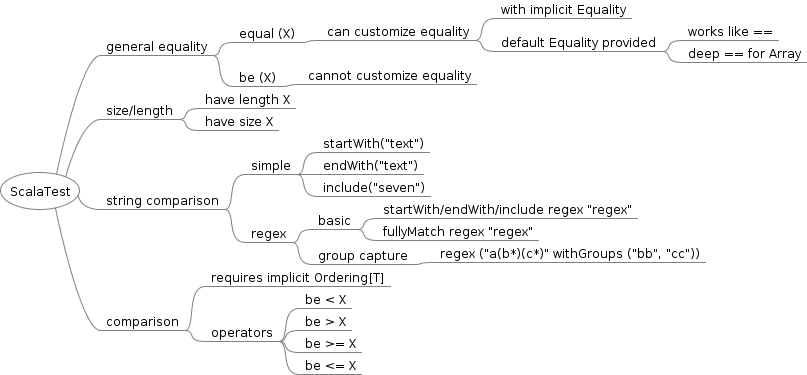
You might notice the following things:
-
consistently with "normal" mind maps, items progressively become less general and more specific the further away from the center,
-
also like "normal" mind maps, items connected "physically" are also related semantically [1],
-
unlike typical mind maps, there very little formatting and decorations were applied. This is because the map is intended to be a transitory step, and not something you will revisit often. Normally, the only formatting I do is hyperlinks and icons for denoting especially important stuff.
-
only a portion of the information from the doc page is included. It’s a deliberate decision - the goal is to provide a source for quickly writing up cards, which are supposed to help you in the long-term - so we’re looking for stuff that’s most useful. In other words, we need the info for your regular life/work, and not to prepare for a fire-and-forget exam.
Step 3: Extract flashcards from the mind map in Anki Desktop
If you haven’t done so already, download and install Anki on your computer.
First, click Create Deck [2]. Since I already have a Scala deck,
I’m going to make a subdeck, which is done by writing Scala::ScalaTest. After the deck is created, click on it.
Now, we’re ready to create the cards proper. Click on Add at the top [3].
You’ll be presented with a view similar to the above (the additional UI elements mostly come from the source code plugin).
We’re going to out of order and start with the second point - asserting size and/or length - since it’s more straightforward. Let’s start with the length:
-
Front: I recommend this to be titled in the way that is the most similar to how you’d try to recall the relevant information. In this case, I’d write "ScalaTest - asserting length".
-
Back: this should contain the relevant information in the most concise way. In this case, all we need is the text of the assert, e.g.
have length X[4].
Now, do the same for asserting size. Here you might think whether it wouldn’t be more efficient to store both pieces of information in a single card. In practice, I find that it’s much more worthwhile to split information into as many cards as possible, as simple cards are much easier to learn and hence produce a better retention effect.
Going up next, we have the string comparisons. Here, I’d suggest to create 8 cards:
-
3 per each "simple" matcher
-
4 per each "regex" matcher
-
1 for the
withGroupsmatcher qualifier.
After that, we’ve got comparisons. Here, I’m going to create just two cards, one per every strict/equal-or pair, since the cases appear to be both semantically and "graphically" coupled.
Note that here I’m omitting the Ordering[T] information, as I’m making the assumption that I can rely on the compiler for recalling that tidbit.
However, if you e.g. use lots of custom classes with dedicated Ordering implementations, creating an additional card might be worth your while.
Finally, let’s go back to the general equality case. The be card is pretty straightforward:
However, for the equal we have to cram some info on the back:
This is unfortunate, however sometimes you have pieces of information that are inseparable.
And there you have it! If you want to study using the cards created for this section, download the pack from here.
Step 4: Learn from flashcards in the Anki Mobile Client(s)
Now that we’ve created the cards, we can move to actually using them. For that, you’ll need to:
-
Get the mobile client, in either the Android or iOS versions
-
Set up AnkiWeb synchronization between your desktop client and your mobile device.
| Please be aware of the content policies before you sync data through AnkiWeb. |
Now that you’ve set it up, and open the synced deck, you should see something like the following:
You’re viewing a new card in the learning stage, which will require at least one repetition on the same day. Always choose the option that authentically reflects your recall ability of that card. Eventually, you should arrive at something similar to the following screen:
Now the choices extend beyond the same day. If your recall is increased effectively, the interval selection will lengthen at a geometric rate. So when in doubt, answer pessimistically - it won’t "cost" you much time.
Step 5: Review, Heal, and Grow your flashcard "Deck"
This is probably the most personalized of the steps. However, a couple common issues might manifest, most notably:
Errors on the cards
Factual, typographical or otherwise: minor ones can be remedied immediately through the mobile client, but for more complex stuff, your best bet is to mark the card by favoriting it, and potentially burying the card, "postponing" it to the following day, if the problem is severe enough so that you can’t meaningfully review the card [5].
Hide/Delete will show Bury.Lack of perceived benefit from using the cards for a particular topic
This mostly stems from not enough understanding of the subject matter. With this method, always try to make a conscious effort to actually comprehend and integrate the source material. This even applies to our relatively simple example - the retention effect for the ScalaTest will be much greater if you practice writing the matcher expressions during the the initial days.
General frustration
In other words, the bog standard reaction to a new habit that one is trying to form. After the initial enthusiasm dwindles, the act of repeating the cards might appear like a chore. In this case, I advise you to
-
simply stick it out if you’re only a couple of weeks in,
-
be honest - if you forgot the card’s content, choose "Again",
-
otherwise try to remember situations where the use of this technique has improve recall, and
-
take note of how much time have you’ve already spent by using this method [6].
Recalling knowledge you no longer need
It happens, whether when studying for actual exams, investing in learning a technology that didn’t pan out, or for other reasons. In this case, you just need to suspend the relevant cards, causing them to no longer appear until they’re manually resumed.
Amassing a huge backlog
-
To prevent that, start small (<100 cards total) until you get the gist of it, and try to set aside some regularly scheduled period in your daily routine for the card review - for example, during your daily commute [7].
-
To resolve it, just chip away at the mass of cards for several days. Due to how the SRS algorithm works, you are bound to eventually reduce the backlog to a manageable size.
Coming Up
In the final part of the series, we’ll look at some actual statistics related to using Anki, and touch on some miscellaneous closing points.

Twitter
Google+
Facebook
Reddit
LinkedIn
StumbleUpon
Email